Understanding how to acclimatise engineered wood flooring is one of the most important steps in achieving a beautiful and durable floor that stands the test of time. Engineered wood flooring, with its real timber top layer and stable multi-ply core, is more resilient to humidity changes than solid wood.
However, it still needs time to adjust to the specific temperature and moisture levels of your home. Skipping or rushing this process can lead to unsightly gaps, cupping, or creaking later on. With the right preparation, your new floor will settle perfectly and retain its stunning appearance for years.
Why Acclimatisation Matters for Engineered Wood Flooring
Even though engineered boards are designed for dimensional stability, the natural wood veneer on top can still respond to environmental conditions. Acclimatisation allows the planks to reach equilibrium with the room’s humidity and temperature, minimising the risk of movement after installation.
A short descriptive paragraph before diving deeper: Proper acclimatisation ensures your investment looks its best and performs reliably, whether you choose a classic oak or contemporary smoked finish. Manufacturers generally recommend a minimum period, but following best practices delivers superior results.
A. Ideal Room Conditions Before Delivery
Maintain indoor temperatures between 18–24°C and relative humidity of 40–55% (ideally closer to 45–50% in the UK). Run your heating or air conditioning system consistently for at least five days before the flooring arrives to stabilise the environment. Avoid extreme fluctuations.
B. Check Subfloor Moisture Levels
Use a reliable moisture meter to test the subfloor. Concrete should typically read below 1.8% CM (or as per manufacturer guidelines), while wooden subfloors need to be within 2% of the flooring’s moisture content. Address any damp issues first.
C. Complete “Wet” Trades
Ensure all plastering, painting, and screeding work is fully dry. These processes release significant moisture into the air, which can interfere with proper acclimatisation.
Read also: How to Install Engineered Wood Flooring (Step-by-Step Guide)
Step-by-Step Guide: How to Acclimatise Engineered Wood Flooring
Once your room is ready, focus on bringing the flooring in and setting it up correctly. This is the core of learning how to acclimatise engineered wood flooring effectively.
A short descriptive paragraph: The goal is to allow air to circulate around the planks so they can gently equalise with the room without being exposed to direct sunlight, vents, or extreme conditions.
A. Store Boxes in the Installation Room
Deliver the flooring directly into the room where it will be laid. Keep cartons flat, spaced a few centimetres apart, and away from walls, radiators, or windows. Do not store them in garages, hallways, or areas with different conditions.
B. Open the Packaging for Better Airflow
Cut or remove plastic wrapping and open both ends of the boxes. For faster acclimatisation, carefully remove planks and lay them flat with small gaps (about 10–15mm) between boards, or cross-stack layers using offcuts as spacers. Many experts recommend this over leaving them fully boxed.
C. Allow Sufficient Time
Most manufacturers suggest a minimum of 48–72 hours. In the UK’s variable climate, especially during winter heating or summer humidity, extending to 3–5 days often yields better results. Check that the planks’ moisture content has stabilised before proceeding.
D. Monitor and Maintain Conditions
Keep the HVAC or heating running at normal living levels throughout the acclimatisation period. Avoid opening windows to outdoor extremes and do not place boxes near heat sources that could dry one side faster than the other.
Common Mistakes to Avoid When Acclimatising
Rushing the process or placing materials in unsuitable conditions is a frequent error that leads to installation problems.
A short descriptive paragraph: By steering clear of these pitfalls, you protect both the appearance and longevity of your engineered wood floor.
A. Installing Too Soon
Never lay the floor the same day it arrives. Even engineered products benefit from time to adjust, particularly in newly built or renovated homes.
B. Poor Air Circulation
Stacking boxes tightly or leaving them sealed prevents moisture exchange. Always prioritise airflow.
C. Ignoring Local Climate Factors
In Peterborough and surrounding areas with cooler, damper winters, pay extra attention to humidity levels. Use a hygrometer to track conditions daily.
D. Exposing to Direct Sunlight or Draughts
Sunlight can cause uneven drying, while draughts from doors or windows create inconsistent moisture levels across the planks.
Recommended Products for Your Project
Choosing high-quality engineered wood makes acclimatisation easier and delivers a superior finish. Consider the Elka Real Wood Woodland Oak Flooring – a popular choice for its stability and elegant pattern that adds instant character to any room. See product for full specifications and sample options.
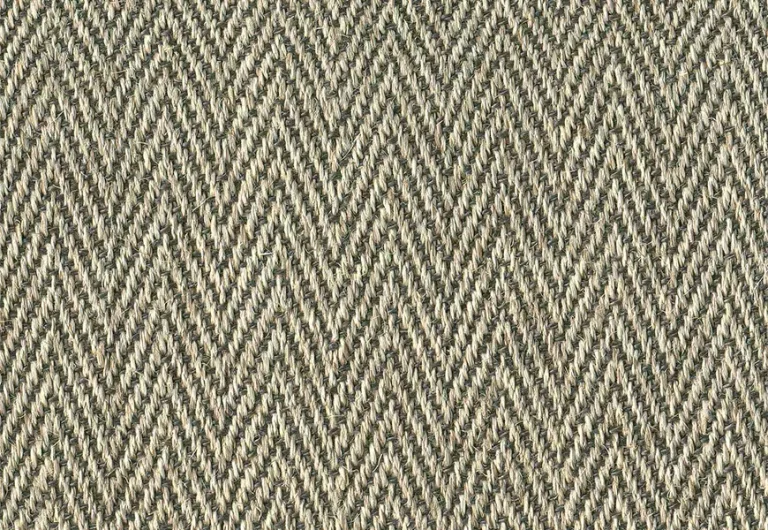
Another excellent option is the Elka 14mm Real Wood Herringbone Dark Smoked Oak Wood Flooring, which features a robust core and easy installation. Its pre-finished surface reduces on-site work while maintaining natural beauty. See product to explore available widths and grades.
For a more contemporary look, the Elka 18mm Real Wood Enhanced Oak Flooring offer timeless appeal with outstanding performance in UK homes. See product for details on finishes that complement both modern and traditional interiors.
Maintaining Your Floor After Installation
Once installed, continue caring for the environment to keep your floor looking its best. Maintain the same stable temperature and humidity levels year-round. Use felt pads on furniture, clean with appropriate wood-friendly products, and consider a humidifier in very dry periods.
A short descriptive paragraph: With proper aftercare, your engineered wood flooring will develop a beautiful patina and remain a centrepiece of your home for decades.
Conclusion: Invest in Quality and Expert Advice
Mastering how to acclimatise engineered wood flooring is the foundation of a successful project that avoids costly repairs down the line. By preparing your space, allowing adequate time, and ensuring good airflow, you give your new floor the best possible start.
For premium engineered wood flooring and professional fitting services, trust the experts at TEKA Flooring Peterborough. Visit our showroom to see the full range, feel the quality underfoot, and discuss your project with our friendly team.
Alternatively, book a no-obligation WhatsApp consultation today – we’re here to help you create the perfect floor for your home. Your dream flooring is just a step away.Read also: Engineered Oak Flooring Buying Guide for Your Home