Are you considering laminate flooring for your home but not sure where to start? We’ll cover everything from preparing the room and subfloor to calculating how much to lay laminate flooring you’ll need and the costs involved.
Stay tuned to learn all you need to know about laying laminate flooring in your home!
How to Prepare for Laying Laminate Flooring
Preparing for the installation of laminate flooring is crucial for a successful outcome. It involves measuring the room accurately, acclimatising the flooring to the environment, and ensuring a smooth and clean subfloor to prevent issues later on.
1. Measure the Room
Measuring the room accurately is the first step in preparing for laminate flooring installation. It helps determine the amount of flooring needed and ensures a precise fit for the space.
- When measuring, start by finding the length and width of the room. Be sure to account for any irregularities such as alcoves or cupboards that may require additional material.
- To calculate the square footage, multiply the length by the width. It’s recommended to add 5-10% to this total to allow for any wastage or cutting errors.
Tools like a tape measure, pencil, and calculator are essential for accurate measurements. Consider different room layouts like square, rectangular, or L-shaped, understanding how to adapt the measurements accordingly.
2. Acclimate the Flooring
Acclimatising the laminate flooring to the room’s environment is essential to prevent issues like warping or buckling after installation. This process allows the flooring to adjust to the temperature and humidity levels of the space.
Proper acclimatisation typically involves keeping the flooring material in the room where it will be installed for 48 to 72 hours. During this period, ensure that the room’s temperature is regulated to mimic regular living conditions. It’s crucial to avoid extreme temperature fluctuations or exposure to direct sunlight during acclimatisation.
When storing laminate flooring before installation, place the boxes flat on the ground in a dry, well-ventilated area. Avoid stacking them too high or placing heavy objects on top, as this can cause damage to the planks.
3. Prepare the Subfloor
Preparing the subfloor is crucial for a smooth and long-lasting laminate flooring installation. It involves cleaning the surface, repairing any imperfections, and ensuring a level base for the new flooring.
Once the subfloor is cleaned and repaired, moisture issues need to be addressed. Moisture can seep through the floor, causing damage to the laminate over time. To combat this, a moisture barrier underlay is recommended, especially for concrete subfloors.
If dealing with uneven surfaces, using a self-levelling compound can help create a flat base. This ensures that the laminate flooring sits evenly and prevents any potential damage in the future.
For subfloors with existing flooring, thorough removal is essential. Ensure all traces of the old flooring are eliminated to prevent irregularities that could affect the new laminate.
Tools to Lay Laminate Flooring
To lay laminate flooring effectively, you will require essential tools such as a tape measure, spacers, a saw, a tapping block, and a pull bar. These tools help ensure proper fitting and installation of the flooring.
Using high-quality underlay and adhesives does make a significant difference in the longevity and overall performance of the laminate flooring. For underlay, products like Ball & Young are popular choices due to their sound-reducing and moisture-barrier properties.

See product: Ball & Young Cloud 9 Connoisseur 8 15m2
According to renovation experts, investing in reliable tools can greatly simplify the installation process and ensure a precise and professional finish.
How to Lay Laminate Flooring
Laying laminate flooring requires a methodical approach to ensure a professional finish. From laying the underlay to cutting and fitting the flooring pieces, each step contributes to a successful installation.
1. Lay the Underlayment
Installing the underlay is the first step in laying laminate flooring. It provides cushioning, sound absorption, and moisture protection for the flooring above.
This layer serves as a barrier that helps to smooth out imperfections in the subfloor, creating a stable foundation for the laminate planks. Underlay also aids in reducing noise transfer between floors, making it an excellent choice for multi-storey dwellings or rooms with high foot traffic. There are various types of underlay available, including foam, cork, felt, and rubber options, each offering unique benefits.
- Foam underlay, for instance, is lightweight and easy to install, providing good cushioning and sound absorption.
- Cork underlay is eco-friendly, offering excellent thermal insulation and resistance to mould and mildew.
- Felt underlay is known for its moisture resistance, making it ideal for areas prone to dampness.
- Rubber underlay is durable and provides superior sound reduction, suitable for areas where noise control is essential.
When selecting the appropriate underlay product, consider your subfloor conditions. Ball & Young Underlay can cater to various subfloor types, including wood, concrete, or vinyl, ensuring a smooth installation process. For instances where moisture is a concern, Roberts AirGuard offers moisture protection while reducing noise transmission, perfect for basement installations.
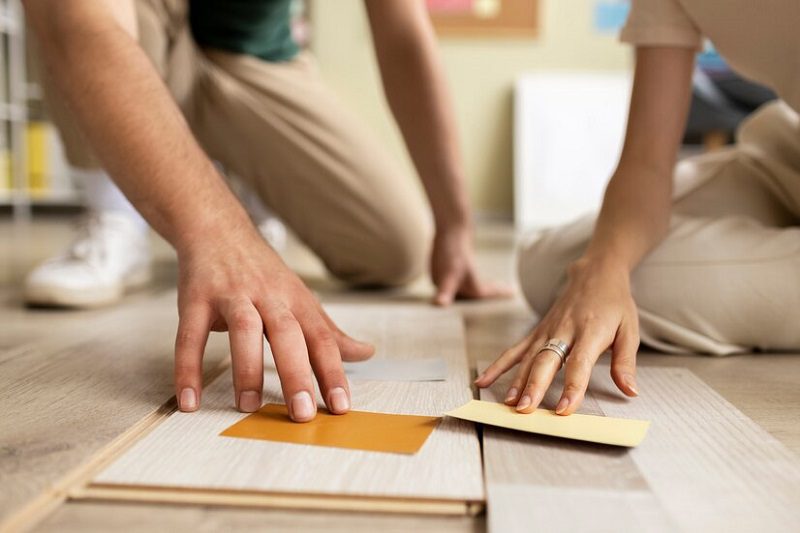
2. Start Laying the Flooring
Commencing the actual installation process involves laying the first rows of laminate flooring. This step sets the foundation for the rest of the installation and requires precision and attention to detail.
Ensuring that the initial rows are aligned perfectly lays the groundwork for a smooth and professional finish. Alignment plays a crucial role in the overall aesthetics of the floor. To achieve this, use spacers to maintain consistent spacing between the planks while ensuring they interlock seamlessly. Remember to stagger the joints for structural integrity and a visually appealing look. By following these steps, you will create a harmonious and polished appearance throughout the room.
3. Cut and Fit the Flooring
Cutting and fitting the laminate flooring around obstacles, corners, and edges is a crucial step for a seamless finish. It requires precision in measurements to ensure a snug fit against walls and doorways. Utilise a jigsaw or handsaw for intricate cuts, while a table saw works best for straight lines. Remember to maintain expansion gaps along the walls and transitions to prevent buckling. To achieve a professional look, carefully trim excess material and secure the planks using an appropriate adhesive or underlay. These steps will result in a polished laminate flooring installation.
4. Install the Baseboards
Completing the laminate flooring installation involves installing skirting boards to cover the expansion gaps and provide a polished look to the room. Properly installed skirting boards enhance the overall aesthetics of the flooring.
When choosing skirting boards, it’s essential to consider the material and style that will best complement your laminate flooring.
- MDF skirting boards are a popular choice due to their affordability and versatility.
- Hardwood skirting boards offer a more premium look.
Selecting a skirting board profile that matches the overall style of your space can help tie the room together seamlessly. To achieve a professional finish, it’s important to properly measure and cut the skirting boards, ensuring they fit snugly against the wall and flooring. Use a quality adhesive or nails to secure the skirting boards in place, and finish off with sealant for a seamless transition between the skirting boards and flooring.
How Much to Lay Laminate Flooring Do?
Optimising material usage involves planning the layout carefully to minimise cuts and waste. Choosing the right direction for laying the planks can also affect the amount needed.
If you wonder how much to lay laminate flooring, it’s recommended to consult with flooring experts or utilise online calculators for accurate measurements before making a purchase decision.
1. Calculate the Square Footage
Calculating the square footage for laminate flooring involves measuring the length and width of the room and multiplying these dimensions. It is essential to account for any alcoves, cupboards, or irregular shapes when determining the total area.
To start, measure the length of the room from one wall to the opposite one, and do the same for the width. For example, if the room is 10 feet long and 8 feet wide, the total square footage would be 80 square feet (10 x 8 = 80). Bear in mind that if there are alcoves, you should measure and calculate them separately. This accuracy ensures you order the right amount of laminate flooring for your project.
2. Consider Additional Flooring for Waste
Allocating additional laminate flooring for waste is a prudent approach to ensure sufficient material for cuts, mistakes, and future repairs. It is recommended to purchase a surplus of around 10% to 15% to account for unforeseen circumstances.
Estimating the right amount of extra material is vital in avoiding delays and frustrations during the installation process. When calculating waste, it’s essential to consider the room size, shape, and any intricate patterns that may require more cuts. By factoring in the layout of the space, you can determine where extra pieces may be needed.
Having surplus flooring not only provides a buffer for mistakes but also enables you to replace damaged planks in the future without worrying about discontinued styles. It ensures consistency in appearance and simplifies maintenance down the line, making it a smart investment for the long run.
Cost to Lay Laminate Flooring
The cost of laying laminate flooring includes expenses for materials, labour, and additional costs such as underlay, trim pieces, and transitions. Understanding these cost components is essential for budgeting a successful flooring installation.
1. Cost of Materials
The cost of materials for laminate flooring installation includes the price of the flooring planks, underlay, adhesive, and any required transitions or trim pieces. The quality and style of the materials chosen can influence the overall project cost.
One of the crucial factors to consider when selecting materials for laminate flooring is the type of flooring planks. Opting for high-quality planks can enhance both the durability and visual appeal of the finished floor.
Similarly, choosing the right underlay is essential as it can impact the comfort and longevity of the flooring. Carefully selecting the adhesive that suits the specific flooring type can ensure a secure and long-lasting installation. Don’t overlook the importance of transitions and trim pieces, as they contribute to the seamless and polished look of the flooring.
2. Cost of Labour
The labour cost for laying laminate flooring varies based on factors like the complexity of the installation, room size, and local labour rates. Hiring professional installers or opting for DIY installation can impact the overall project expenses.
Professional installation services for laminate flooring typically range from £10 to £20 per square metre, depending on the quality of materials and the intricacy of the job. Factors such as removing existing flooring, subfloor preparation, and the need for underlay can also affect the total cost. Hiring professionals ensures efficient and precise installation, reducing the risk of errors that may result in additional expenses down the line.
On the other hand, undertaking a DIY installation can lead to cost savings, with materials costing between £5 to £15 per square metre. Websites like MyBuilder.co.uk and Checkatrade.co.uk offer insights into labour costs from various contractors, helping homeowners make informed decisions.
3. Additional Costs to Consider
Plus material and labour expenses, there are other costs to consider when laying laminate flooring, such as underlay, trim pieces, transitions, and delivery fees. These additional expenses can impact the overall budget for the installation.
When planning for laminate flooring installation, it’s crucial to account for the often overlooked costs like trim pieces that provide a polished finish to the edges. Opting for quality trim pieces can add a touch of elegance to your flooring while also contributing to a cohesive look. Similarly, investing in suitable underlay options is essential for sound absorption and protection against moisture.
Another aspect to budget for is the necessary tools required for a seamless installation. Items such as saws, tape measures, spacers, and installation kits should not be underestimated in terms of cost. Seeking cost-saving strategies, consider renting specialised tools or borrowing from friends or neighbours to avoid unnecessary expenses.
Enjoy special pricing on TEKA Flooring laminate purchases. We offer enticing discounts on a range of laminate flooring options, now priced at £17.02/m² from the previous £20.02/m², such as Elka 8mm V-Groove Country Oak or Elka 8mm V-Groove Frosted Oak.
For the installation, you can rely on our professional fitting services. Having over 30 years of combined experience, we are very confident in the quality of our work, you’ll also get 24-month floor fitting warranty.
We can do site visits on certain evenings and Saturdays. Please do get in touch so that we can discuss further and schedule to the best of our ability!
Read also: