Installing laminate flooring on concrete is a popular DIY project that can completely transform a room. Concrete subfloors are common in ground-floor rooms, basements, and modern builds, and they provide a solid foundation for laminate as long as proper preparation is followed.
This guide walks you through every step of the process, from testing moisture levels and preparing the concrete to laying underlay and fitting the laminate flooring planks themselves.
Can You Lay Laminate Flooring Directly on Concrete?
Yes, but never without proper preparation. Laminate cannot be placed directly onto bare concrete because concrete retains moisture that will damage the flooring over time. You will always need a damp-proof membrane (DPM) and suitable underlay between the concrete and the laminate planks.
Without these protective layers, moisture can seep upward through the concrete slab, causing the laminate to swell, warp, or develop mould underneath. Getting this preparation right is the single most important factor in a successful installation.
Preparing the Concrete Subfloor
Testing for Moisture
Before anything else, test the concrete for moisture. Tape a piece of polythene sheeting (roughly 1m x 1m) flat against the concrete and leave it for 24 to 48 hours. If condensation appears on the underside when you lift it, the concrete has excessive moisture and needs a proper DPM before installation can proceed.
For a more precise reading, use a digital moisture meter. Concrete moisture content should be below 75% relative humidity (or under 2% with a carbide bomb test) before laying laminate. New concrete screeds can take several weeks to fully dry, so patience at this stage prevents serious problems later.
Cleaning and Levelling
Sweep the concrete thoroughly and remove any debris, dust, old adhesive residue, or paint spots. The surface must be clean for the DPM and underlay to sit flat without bumps or air pockets.
Check for levelness using a long spirit level or straight edge. Laminate flooring requires the subfloor to be level within 2mm over a 1-metre span. Fill any dips, cracks, or low spots with self-levelling compound and allow it to cure fully before proceeding. High spots should be ground down with a concrete grinder. For detailed guidance on this step, see our guide on how to level a floor before laying flooring.
Acclimatising the Laminate
Leave the laminate planks in their unopened packaging in the room where they will be installed for at least 48 hours before fitting. This allows the material to adjust to the room’s temperature and humidity, reducing the risk of expansion or contraction after installation.
Keep the room at normal living temperature (18 to 22 degrees Celsius) during this period. Do not store planks in a garage or unheated space, as the temperature difference will negate the acclimatisation process. For more on this step, read our guide on acclimatising flooring before installation.
Tools and Materials Needed
- Damp-proof membrane (polythene sheeting, 200 gauge minimum)
- Laminate underlay (foam, cork, or combination with built-in DPM)
- Tape measure and pencil
- Spirit level or straight edge
- Spacers (8 to 10mm)
- Tapping block and pull bar
- Rubber mallet
- Circular saw, mitre saw, or jigsaw for cutting planks
- Stanley knife for cutting underlay
- Gaffer tape or foil tape for sealing underlay and DPM joints
- Self-levelling compound (if needed)
Installing the Damp-Proof Membrane and Underlay
Roll out the DPM across the entire concrete floor, overlapping each sheet by at least 200mm and taping all seams with waterproof tape. Run the DPM up the walls by approximately 50mm to create a tray effect that prevents edge moisture from reaching the laminate.
Next, lay your underlay on top of the DPM. Many modern underlays include a built-in moisture barrier, which eliminates the need for a separate DPM layer. Butt the underlay sheets edge to edge (do not overlap, as this creates an uneven surface) and tape the seams together. The underlay provides cushioning, sound insulation, and thermal comfort on cold concrete floors.
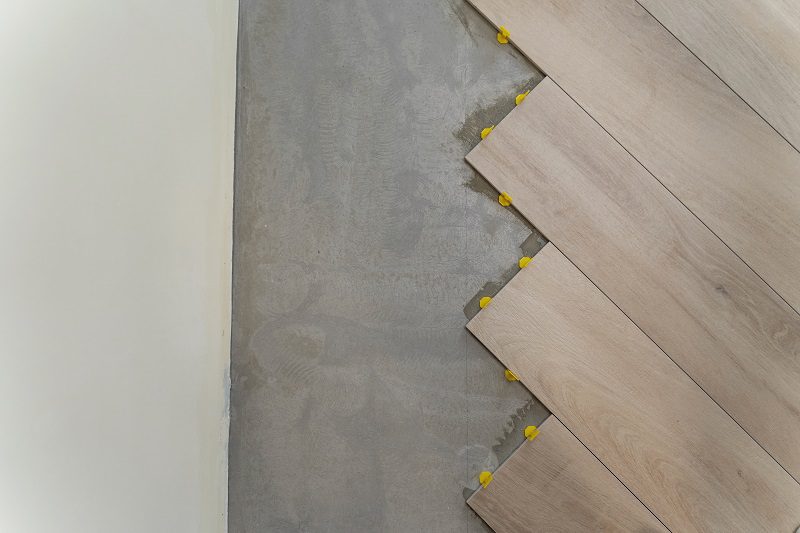
Laying the Laminate Planks
Starting the First Row
Begin along the longest, straightest wall in the room. Place spacers (8 to 10mm) between the planks and the wall to allow for expansion. Laminate expands and contracts with temperature and humidity changes, so this gap is essential to prevent buckling.
Lay the first plank with the tongue side facing the wall. Click the end joint of the next plank into the first at a slight angle, then press flat. Continue along the wall, cutting the final plank in the row to fit. If the offcut is at least 300mm long, use it to start the next row for a natural staggered pattern.
Continuing Subsequent Rows
For each new row, angle the long edge of the plank into the previous row’s groove and press down until it clicks securely. Use a tapping block and rubber mallet to close any gaps along the short ends. Stagger the end joints by at least 300mm from the previous row to create a strong, stable floor with a natural appearance.
Work row by row across the room, checking regularly that planks are fully locked together with no visible gaps. Keep spacers in place along all walls and around any pipes or fixed objects.
Cutting Around Obstacles
For door frames, use an offcut of laminate and underlay as a guide to mark the height, then cut the bottom of the architrave with a multi-tool or hand saw so the laminate slides underneath. For pipes, drill a hole slightly larger than the pipe diameter, make a straight cut to the hole, fit the plank around the pipe, and glue the cut section back in place. Cover with a pipe collar for a neat finish.
Fitting the Last Row
Measure the remaining gap (minus the expansion gap) and rip the final row of planks to width using a circular saw. Use a pull bar and rubber mallet to click the last row into place, as there will not be enough room to angle the planks in by hand.
Finishing Touches
Once all planks are laid, remove the spacers and install skirting boards or beading to cover the expansion gaps around the perimeter. Use transition strips or door bars where the laminate meets other flooring types or at doorways. For a step-by-step guide on this, see our article on fitting a door bar between two floors.
Allow 24 hours before placing heavy furniture on the new floor to let the planks settle fully into their locked positions. For ongoing care, regular sweeping and occasional damp mopping will keep the floor looking its best. Learn more in our guide on how to clean laminate floors.
Common Mistakes to Avoid
- Skipping the moisture test and laying directly on damp concrete
- Forgetting expansion gaps, which causes buckling in warm weather
- Not acclimatising planks for at least 48 hours before installation
- Overlapping underlay sheets instead of butting them edge to edge
- Using a hammer directly on planks instead of a tapping block
- Cutting planks too short for proper stagger (minimum 300mm offset)
- Installing over an unlevel surface, which leads to creaking laminate flooring
If you are unsure about any part of the process, consider using a professional flooring fitting service. TEKA Flooring offers professional installation with a 24-month warranty and over 30 years of combined experience. Call us on 01733 731 930 for a free quote.
Frequently Asked Questions
Do you need underlay for laminate on concrete?
Yes, underlay is always required when laying laminate on concrete. It provides cushioning, reduces noise, and helps smooth minor surface imperfections. You also need a damp-proof membrane to protect against moisture rising through the concrete. Many underlays now include a built-in moisture barrier, which simplifies the process to a single layer.
How long does concrete need to dry before laying laminate?
New concrete screeds typically need 4 to 6 weeks of drying time per 25mm of thickness. A standard 50mm screed may take 8 to 12 weeks to dry sufficiently. Always test moisture levels with a meter or polythene sheet test before installation rather than relying on time estimates alone, as drying rates vary depending on ventilation, temperature, and humidity.
Can you install laminate flooring on concrete without a moisture barrier?
No. Concrete is porous and will always transmit some moisture upward, even when it appears completely dry on the surface. Without a moisture barrier, this dampness will eventually damage the laminate from beneath, causing swelling, warping, and potential mould growth. A proper DPM is essential for any laminate installation over concrete.
Is it better to glue or float laminate on concrete?
Floating installation (where planks click together without adhesive) is the standard and recommended method for laminate on concrete. Gluing laminate planks down is generally not advised because it prevents the floor from expanding naturally with temperature changes and makes future repairs or plank replacement much more difficult.
What thickness of laminate is best for concrete floors?
For concrete subfloors, choose laminate that is at least 8mm thick. Thicker planks (10mm to 12mm) feel more solid underfoot, produce less hollow sound when walked on, and generally have stronger locking systems that resist movement over time. Combined with quality underlay, thicker laminate provides excellent comfort and performance on concrete. Browse our range of laminate flooring options to find the right product for your project.