Are you looking for a guide on how to laminate stairs? As we know, laminating stairs can be a cost-effective and stylish way to upgrade your home’s interior. In this comprehensive guide, we will explore the process of laminating stairs, including the benefits, materials needed, and step-by-step instructions. From preparing the stairs for lamination to finishing and maintaining the final look, we’ve got you covered. So, if you’re ready to transform your stairs, keep reading to learn everything you need to know about how to install laminate flooring on stairs.

Can You Laminate Stairs?

Why not? Laminating stairs offers numerous advantages that make it a popular choice among DIYers and homeowners looking to upgrade their homes.

One of the key reasons why many homeowners opt for laminate flooring on their stairs is its exceptional durability. Laminate is known for being resistant to scratches, impacts, and wear and tear, making it a practical choice for high-traffic areas like stairs. Its easy maintenance is a major draw – a simple sweep or mop is usually all that’s needed to keep laminate stairs looking fresh and clean.

Moreover, laminate flooring comes in a variety of styles and colours, providing homeowners with endless options to match their home decor and personal tastes. Its cost-effectiveness compared to hardwood or carpet makes it an attractive choice for those looking to upgrade their stairs on a budget.

The Benefits of Laminating Stairs

Laminating stairs ideas provides a cost-effective solution for enhancing the appearance and durability of your home’s staircase. DIYers can easily find a variety of laminate flooring options on Amazon, making it a convenient choice for home improvement projects.

One significant benefit of laminating stairs is the extensive range of styles and finishes available, allowing homeowners to achieve the desired aesthetic for their staircase without breaking the bank. Cost-effectiveness is further emphasised by the durability of laminate flooring, ensuring long-lasting results even in high-traffic areas like stairs. In addition, many popular laminate flooring brands, such as Pergo, Armstrong, and Mohawk, offer quality products through Amazon, providing a hassle-free shopping experience for those embarking on their DIY stair enhancement journey.

Materials Needed to Laminate Stairs

To laminate stairs successfully, you will need specific materials that ensure a professional finish and long-lasting results.

Essential materials for laminating stairs primarily include high-quality laminate flooring that fits the dimensions of your stairs. Alongside this, a reliable adhesive, specifically designed for laminate installation, is crucial to ensure a lasting bond between the laminate and the stairs. Having the right tools is paramount for a successful DIY project. Tools such as a saw, measuring tape, trowel, and hammer will aid in cutting and installing the laminate with precision and accuracy.

Best Laminate Flooring for Stairs

When choosing laminate flooring for stairs, it is crucial to select a durable and slip-resistant option that can withstand high traffic and provide a secure footing.

One important aspect to consider is the durability of the laminate flooring. Stairs often experience heavy foot traffic, so opting for a high-quality laminate, such as those offered by QuickStep or Elka, can ensure longevity and minimal wear and tear.

Slip resistance is paramount for safety. Look for laminates with textured surfaces or added grip to prevent accidents, especially in homes with children or elderly individuals.

Another crucial factor is the aesthetic compatibility with your current decor. Choose a laminate style and colour that enhances the overall look of your staircase and complements the existing interior design.

See product: Elka 8mm V-Groove Country Oak

Tools Needed for Laminating Stairs?

To laminate stairs effectively, you will require a set of essential tools including a detail sander, cordless oscillating multi-tool, and a jigsaw to ensure precise cutting and installation.

When tackling a DIY laminating project on your staircase, having the right tools can make all the difference in achieving a professional finish.

A quality detail sander will help you smooth out imperfections on the stairs before laminating, ensuring a seamless surface for the new material. The cordless oscillating multi-tool is versatile and perfect for intricate cuts and notches required during the installation process. As for the jigsaw, it’s essential for accurately cutting the laminate to fit each stair tread with precision.

How to Prepare Stairs for Lamination

Before laminating stairs, thorough preparation is essential to ensure a smooth and long-lasting finish that enhances the overall appearance of your staircase.

The first step in preparing stairs for lamination is to clean the surface thoroughly, removing any dust, dirt, or debris that may interfere with the bonding of the laminate.

Filling any gaps or cracks with an appropriate filler is vital to prevent air pockets or uneven surfaces that could affect the lamination process. Take your time to ensure the filler is level and smooth before proceeding to the next step.

Inspect the stairs carefully to double-check that the surface is clean, smooth, and free of any imperfections before applying the laminate.

1. Clean the Stairs

The first step in preparing stairs for laminating is to ensure they are thoroughly cleaned and free from any dust, debris, or residues that may affect the adhesion of the laminate flooring.

  1. To achieve this, start by sweeping the stairs to remove loose dirt and debris.
  2. Next, use a vacuum cleaner to reach into corners and crevices, ensuring all particles are removed.
  3. For stubborn spots, a damp cloth with a mild detergent can be used to wipe away grease or other contaminants.

It is crucial to dry the stairs completely before proceeding to the laminating process as any moisture can interfere with the adhesive’s effectiveness.

2. Sand the Stairs

Sanding the stairs is crucial to achieving the right level of abrasion necessary for the adhesive to bond effectively with the laminate flooring, ensuring a strong and durable finish.

Properly sanding the stairs not only enhances the aesthetic appeal of the laminate but also provides a smooth and even surface for installation.

  1. Choosing the right sanding tools can make this task more efficient and effective, ensuring that the stairs are prepped to the recommended abrasion class.
  2. By achieving the appropriate abrasion level, the adhesive can form a secure bond with the laminate, reducing the risk of peeling or damage over time.

3. Fill in any Gaps or Holes

Before laminating stairs, it is essential to fill any gaps or holes in the staircase to create a smooth and even surface for the installation of laminate flooring.

One of the key steps in this process is selecting the appropriate filling material. Wood filler is commonly used for wooden stairs, as it blends seamlessly with the material. For larger voids, a two-part epoxy filler can provide strength and durability. Before applying the filler, make sure to clean out any debris or dust from the gaps.

When filling the holes, it is essential to ensure the surface is levelled and smooth. Using a putty knife or a trowel can help spread the filler evenly. Allow the filler to dry completely before sanding it down to achieve a seamless finish. Remember, proper preparation ensures a professional-looking result.

How to Laminate Stairs

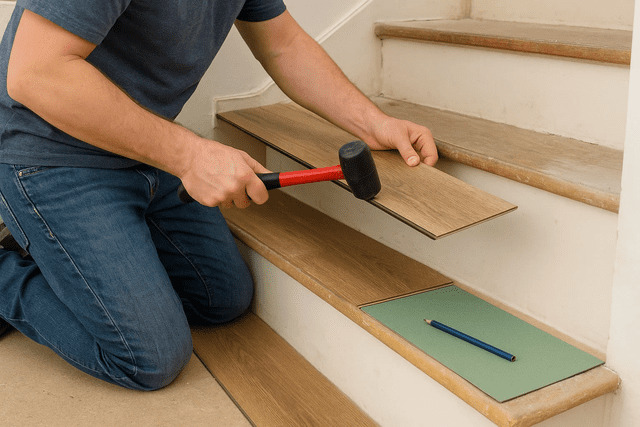
How to laminate stairs? Laminating stairs involves a series of steps that require precision and attention to detail to achieve a flawless finish that enhances the aesthetics of your staircase.

First, carefully measure each stair tread and riser to determine the dimensions needed for the laminate pieces. Use a tape measure to ensure accuracy.

Next, cut the laminate pieces to size using a table saw or a circular saw. Once you have the pieces cut, apply a high-quality laminate adhesive to the back of each piece, making sure to spread it evenly.

Place the laminate pieces on the stairs, starting from the bottom and working your way up. Press each piece firmly into place to ensure proper adhesion. Secure the laminate pieces by nailing them in place using finishing nails. After all pieces are secured, trim any excess material using a sharp utility knife.

1. Measure and Cut Laminate Pieces

Accurate measurement and cutting of laminate pieces are essential to ensure a precise fit on the stairs and minimise waste during the lamination process.

Regarding working with laminate flooring on stairs, precision is key. One of the most efficient tools for achieving accurate cuts is a jigsaw, allowing for smooth edges and tailored fits. By carefully measuring each step and riser, and using the jigsaw to make these cuts, installers can create a seamless look that enhances the aesthetic appeal of the staircase. This attention to detail not only elevates the overall appearance but also plays a significant role in the longevity and durability of the installation.

2. Apply Adhesive to Stairs

Applying the right adhesive to the stairs is crucial for ensuring a strong bond between the laminate flooring and the surface, enhancing the durability and longevity of the lamination.

Before applying the adhesive, it is essential to prepare the surface by ensuring it is clean, dry, and free of any debris to promote better adhesion. Use popular Wood Glue that is strong and versatile for various surfaces, including stairs. Using a trowel or a suitable applicator, spread the adhesive evenly on the stairs to avoid uneven bonding. Press the laminate flooring firmly onto the adhesive, ensuring a flat and smooth finish.

3. Place Laminate Pieces on Stairs

Positioning the laminate pieces correctly on the stairs is essential to ensure a uniform and aesthetically pleasing finish that enhances the overall appearance of the staircase.

When placing laminate on stairs, taking care to align each piece properly not only guarantees a polished look but also ensures longevity by minimising wear and tear.

Alignment plays a crucial role in achieving a seamless transition between steps, creating a professional and inviting atmosphere within your living space.

Maintaining consistent spacing between the laminate planks is key to avoiding buckling or gaps, providing both safety and visual appeal.

Proper positioning will not only showcase your attention to detail but also elevate the elegance of your staircase design.

4. Secure Laminate Pieces

Securing the laminate pieces in place is a critical step to prevent shifting or movement, ensuring a stable and long-lasting installation that withstands daily wear and tear.

To achieve this, it is vital to press firmly along the edges and surfaces of each piece during the installation process. This ensures a strong bond between the laminate and the stair surface, minimising the risk of any future loosening. Using the appropriate tools, such as a rubber mallet or a tapping block, can help provide even pressure and secure placement. Once the pieces are in position, allowing ample drying time for the adhesive to set is crucial before walking on the newly installed laminate stairs. By following these techniques, you can enhance the durability and longevity of your stair renovation project.

5. Trim Excess Laminate

Trimming excess laminate carefully and precisely is essential to achieve a clean and professional finish on the stairs, enhancing the overall appearance and ensuring a seamless transition between steps.

Regarding tackling this task, utilising a jigsaw can be immensely beneficial. The jigsaw allows for accurate cuts, especially in curved or intricate areas, resulting in a refined appearance. Ensure that the jigsaw blade is suitable for laminate material to avoid chipping or splintering. It’s recommended to use masking tape on the cut line to prevent any potential damage to the laminate surface. Take your time and follow a steady hand to achieve precise cuts for a polished finish.

How to Finish Laminated Stairs

After laminating stairs, the finishing touches play a crucial role in enhancing the aesthetics and longevity of the laminate flooring, ensuring a polished and durable surface for daily use.

Once the lamination process is complete, the first step in finishing involves thorough cleaning to remove any debris or dust particles that may have settled during the installation. Inspection follows closely, as it is essential to check for any imperfections, such as air bubbles or uneven surfaces, which could detract from the overall appearance and quality of the stairs. Taking the time to carefully assess and address these issues ensures a flawless finish.

Following the inspection, applying a protective finish is key to maintaining the lamination’s quality and appearance. This step involves choosing the appropriate coating, whether it be a clear sealant or a tinted varnish to enhance the colour of the laminate. The application process should be meticulous, ensuring even coverage to protect the stairs from wear and tear.

1. Clean and Inspect Stairs

Regular cleaning and inspection of laminated stairs is essential to preserve their appearance and functionality, ensuring a well-maintained and attractive staircase.

To start the cleaning process, use a soft-bristled brush or a vacuum cleaner with a brush attachment to remove any dust, dirt, or debris from the stairs. Be gentle to avoid scratching the laminate surface. Next, dampen a microfibre cloth with a mixture of mild detergent and water to wipe down the stairs, focusing on any stubborn stains. Remember not to oversaturate the cloth, as excess moisture can damage the lamination.

During the inspection, check for any signs of wear and tear, such as peeling edges or scratches. Address these issues promptly by applying a laminate repair paste or contacting a professional for assistance. Regular maintenance not only extends the lifespan of your stairs but also enhances the overall aesthetic appeal of your home.

2. Apply Finishing Touches

Applying the final touches to laminated stairs, such as trim pieces or stair nosing, can enhance the overall aesthetics and functionality of the staircase, giving it a polished and cohesive look.

Trim pieces play a crucial role in not only providing a clean finish but also in protecting the edges of the steps, preventing wear and tear over time. Incorporating decorative elements like intricate mouldings or ornate balusters can elevate the staircase from a mere functional element to a statement piece in your home.

Stair nosing, another essential component, offers both visual appeal and safety by providing a defined edge to each step, reducing the risk of slipping. Choosing high-quality materials and finishes for these final details can make a significant difference in the overall ambience and durability of your staircase.

3. Allow Time to Dry

Allowing sufficient time for the adhesive to dry completely is crucial to ensure a secure bond and stable lamination on the stairs, preventing premature damage or shifting of the laminate pieces.

While it may be tempting to rush the process and move forward quickly, patience in this step is key. Proper drying time allows the adhesive to set firmly, creating a solid foundation for the laminate pieces. Hastening this stage can lead to a weaker bond, which may compromise the durability and longevity of the staircase. Remember, taking the time to let the adhesive cure fully will result in a professional finish that not only looks polished but also stands the test of time.

How to Maintain Laminated Stairs

After understanding how to laminate stairs, it’s now time for you to learn about how to maintain it. Proper maintenance is key to preserving the quality and appearance of laminated stairs, ensuring their longevity and durability over time.

Regular upkeep not only enhances the visual appeal of laminated stairs but also plays a crucial role in maintaining their structural integrity. Cleaning these stairs with mild detergent and a damp cloth can effectively remove dirt and grime without causing any damage to the lamination.

It’s equally vital to address any signs of wear and tear promptly. Minor scratches or chips can be easily repaired using specialised laminate repair kits, preventing further deterioration and maintaining the polished look of the stairs.

1. Regular Cleaning and Maintenance

Regular cleaning and maintenance are essential practices for DIY enthusiasts to maintain the quality and longevity of laminated stairs, ensuring a pristine appearance and minimising wear and tear.

Regarding cleaning laminated stairs, a gentle approach is key to avoid damaging the laminate finish. Start by using a soft-bristled broom or a vacuum with a brush attachment to regularly remove dust and debris. For tougher stains or spills, a damp cloth with a mild detergent solution can be gently applied. Caution should be taken to avoid excess water, as laminate is vulnerable to moisture damage.

2. Repair Any Damage

Promptly repairing any damage or wear on laminated stairs is crucial to prevent further deterioration and maintain the structural integrity and aesthetics of the staircase.

When addressing scratches, one effective solution is to use a laminated stair repair kit specifically designed for this purpose. These kits typically contain colour-matched putty or markers to conceal the scratches seamlessly. For more severe damage like chips, consider using a laminate patching compound that can fill in the gaps and restore the smooth surface of the stairs. It’s essential to follow the manufacturer’s instructions carefully to ensure a successful repair without compromising the quality of the lamination.

3. Avoid Harsh Chemicals

To preserve the quality and appearance of laminated stairs, it is essential to avoid using harsh chemicals or abrasive cleaners that can damage the laminate surface or adhesives.

Using gentle cleaning products specifically designed for laminated surfaces not only ensures effective cleaning but also safeguards the integrity of the material. Harsh chemicals can strip away the protective layer of the laminate, leaving it more vulnerable to stains and scratches. By opting for milder cleaners, you can extend the lifespan of your laminated stairs and maintain their original shine.

Upgrade your home with the perfect blend of style and durability. Discover our premium laminate flooring for stairs & hallway at TEKA Flooring, and let our expert team handle the installation for a seamless, professional finish. Don’t wait—transform your stairs today! Visit TEKA Flooring now and take the first step towards a beautiful home makeover.

Read also:

Back To Blog


Leave a Reply

Sign up for our newsletter for the latest deals and exclusive offers!