Looking to give your space a fresh new look with laminate flooring? Learn how to install laminate flooring on concrete to enhance the aesthetic appeal of your home.
This article guides you through preparing for installation, laying the underlayment, installing the laminate flooring, and finishing the installation, and provides tips and tricks to make the process smoother.
Learn tips for installing laminate flooring on concrete successfully and avoid common mistakes along the way.
Preparing for Installation
Preparing for the installation of laminate flooring over concrete involves several crucial steps to ensure a successful and durable outcome. From assessing the condition of the concrete surface to gathering the necessary tools and materials, each step plays a vital role in the overall installation process.
When installing laminate flooring on concrete, you first need to ensure that the concrete slab is clean, level, and dry. Any imperfections in the concrete should be addressed, such as filling cracks and levelling uneven areas.
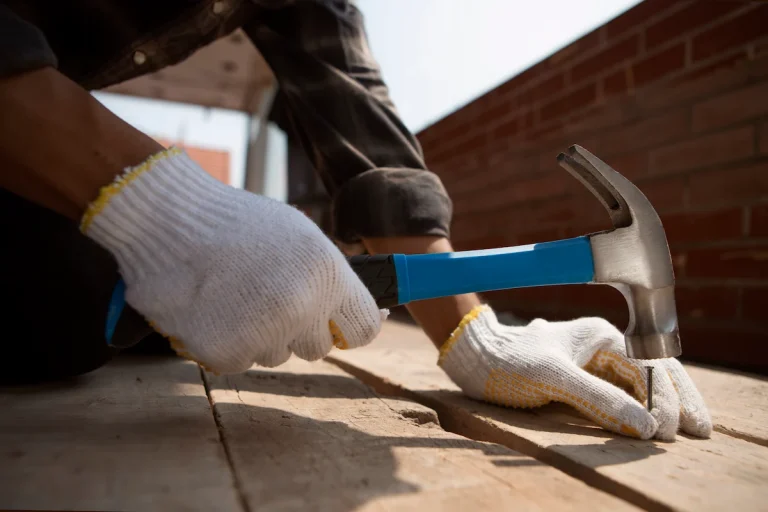
A list of essential tools and materials includes a moisture barrier, underlayment, tapping block, pull bar, circular saw, and spacers. Proper preparation is key to prevent issues like moisture seepage and uneven flooring.
Applying the moisture barrier is essential to protect the laminate from potential water damage and mould growth. The underlayment provides cushioning and sound absorption. Take time in this initial stage to set a solid foundation for a flawless laminate flooring installation.
1. Checking the Condition of the Concrete
Before installing laminate flooring on concrete, it is crucial to thoroughly check the condition of the concrete surface. This step ensures that the flooring will adhere properly and remain stable over time.
Inspecting the concrete condition is essential as it helps in identifying any cracks, dips, or moisture issues that could pose problems during installation. Moisture trapped beneath the laminate can lead to mould growth or warping of the flooring, impacting its durability.
Uneven surfaces can also affect the installation process, causing the laminate to buckle or create gaps. Addressing these potential issues early ensures a smoother installation and a longer lifespan for your laminate flooring.
2. Gathering Necessary Tools and Materials
To install laminate flooring on concrete successfully, gathering the required tools and materials is essential. From moisture barriers to adhesive, having the right supplies ensures a smooth installation process.
- One crucial tool needed is a moisture barrier, which helps protect the laminate flooring from any moisture seeping through the concrete.
- A flooring underlay is essential to provide cushioning, reduce noise, and act as a moisture barrier.
- Other necessary tools include a tape measure for accurate cuts, a saw for trimming the laminate planks, a tapping block for seamless connections, and spacers for ensuring proper expansion gaps.
- A rubber mallet is vital for gently tapping the planks into place without damaging them during installation.
3. Acclimatising the Laminate Flooring
Before proceeding with the installation, it is crucial to acclimatise the laminate flooring to the installation environment. This step helps prevent issues such as warping or buckling once the flooring is in place.
Acclimatisation involves allowing the flooring to adjust to the humidity and temperature of the room. Typically, laminate flooring needs to acclimatise for around 48 hours before installation. During this time, keep the flooring in its unopened boxes and lay them flat in the room where they will be installed. Ensure the room is at a consistent temperature and humidity level close to normal living conditions to promote proper acclimatisation.
How to Lay the Underlayment
Does laminate flooring need underlayment on concrete? Laying the underlayment for laminate flooring over concrete is a crucial preparatory step that ensures proper insulation and protection for the flooring. By following the correct procedures, you can create a stable foundation for the laminate planks.
Choosing the right underlay materials is key to achieving optimal results.
- Vapour barrier underlays provide moisture protection, which is essential for concrete floors to prevent mould and mildew.
- Sound-dampening underlays help reduce noise transmission, especially in multi-storey buildings.
When installing the underlay, ensure that seams are properly sealed to maintain the integrity of the moisture barrier. Taking the time to properly prepare the concrete surface before laying the underlayment is also crucial to prevent issues like uneven flooring or shifting over time.
1. Cleaning and Levelling the Concrete
Before installing the underlay, it is essential to clean and level the concrete surface thoroughly. Removing debris, and dust, and levelling any uneven areas will ensure a smooth underlay installation process.
- Start by sweeping the entire concrete surface to remove loose dirt, leaves, and other debris. You can use a broom or a shop vacuum for this task.
- Next, inspect the floor for any cracks, holes, or uneven spots that need levelling. Fill in the gaps with a suitable patching compound and use a trowel to smooth it out.
- Once the surface is clean and level, you can proceed with applying a concrete cleaner to remove any stubborn stains or grease. Rinse the surface thoroughly and allow it to dry completely before laying down the underlay.
2. Cutting and Installing the Underlayment
Cutting and installing the underlay for laminate flooring over concrete requires precision and attention to detail. Properly fitting and securing the underlay is essential for the stability and longevity of the flooring.
Before beginning the cutting process, ensure that the concrete surface is clean and free of any debris or moisture that could affect the underlay’s adhesion. Use a measuring tape to accurately determine the dimensions needed for the underlay sheets, ensuring a snug fit without overlapping. When cutting the underlay, utilise a sharp utility knife and a straight edge to create clean and precise edges.
Proper alignment and placement of the underlay sheets are crucial to prevent any gaps or uneven areas that could impact the quality of the laminate flooring installation. Once the underlay is cut to size, carefully lay it out on the concrete floor, overlapping seams by the manufacturer’s recommended distance. Secure the underlay in place using adhesive or tape, making sure it lies flat and smooth.
How to Install Laminate Flooring on Concrete
Can laminate flooring be installed on concrete? Installing laminate flooring on concrete involves a series of steps that require precision and care to achieve a professional result. From measuring and cutting the planks to securing them in place, each step contributes to the overall durability and aesthetic appeal of the flooring.
Before starting the installation process, ensure the concrete subfloor is clean, dry, and level to provide a solid foundation. Next, measure the room dimensions accurately to determine the amount of material needed. Then, carefully cut the planks using a saw, ensuring precise edges for a seamless finish.
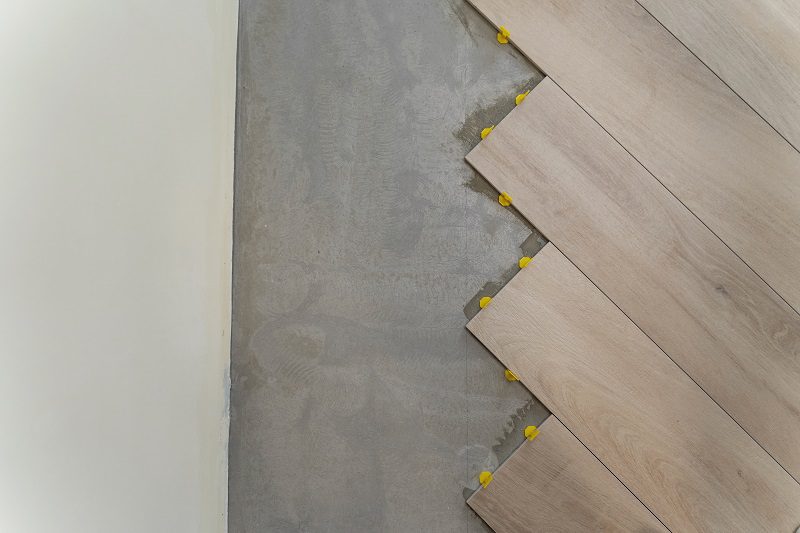
When laying the planks, begin in a corner and work row by row, interlocking each piece securely. Utilise spacers to maintain consistent gaps along the walls for expansion purposes.
Once all planks are in place, securely secure them with appropriate adhesive or locking mechanisms. Finish off by adding skirting boards to complete the polished look.

See product: Quick-Step Classic Ash Grey Oak
1. Measuring and Cutting the Planks
Accurate measurement and precise cutting of the laminate planks are crucial for a seamless installation. Taking the time to measure and cut the planks correctly ensures a professional finish and reduces waste during the installation process.
Before starting the installation, gather the necessary tools including a tape measure, pencil, T-square, and a circular saw or handsaw.
Begin by measuring the dimensions of the room where the laminate flooring will be installed. Measure both the length and width of the room and be sure to account for any alcoves or irregular angles.
Use the measurements to calculate the square footage of the area and then refer to the manufacturer’s instructions for the specific type of laminate flooring being used.
Properly marking the planks before cutting is essential to avoid mistakes, so double-check all measurements before making any cuts.
2. Applying Adhesive or Moisture Barrier (if necessary)
In some cases, applying adhesive or a moisture barrier may be necessary when installing laminate flooring over concrete. These additional steps help ensure proper adhesion and protection against moisture-related issues.
The adhesive serves as a crucial element in securing the laminate flooring to the concrete substrate, creating a strong bond that prevents shifting or loosening over time. The moisture barrier, on the other hand, acts as a shield against moisture seeping up from the concrete, which can lead to warping, buckling, and mould growth.
By including these extra layers, homeowners can significantly prolong the lifespan of their flooring and maintain its pristine appearance. When installing, it’s essential to apply the adhesive evenly and allow sufficient time for it to cure before proceeding with laying down the laminate planks.
3. Installing the First Row of Planks
The initial row of laminate planks sets the foundation for the entire installation. Ensuring proper alignment, spacing, and secure attachment of the first row is essential for the overall stability and visual appeal of the flooring.
When starting the installation process on concrete, it is crucial to first prepare the surface by ensuring it is clean, dry, and level. Use a moisture barrier to protect the laminate planks from any potential moisture in the concrete.
- Before laying the first row, measure the width of the room and calculate how many planks will fit.
- Start by placing spacers along the walls to maintain an expansion gap.
- Lay the first plank along the longest wall, ensuring it is perfectly straight and parallel to the wall.
As you continue adding planks, make sure to stagger the joints for a more natural look. Use a tapping block and a rubber mallet to secure each plank tightly together. Check the alignment and spacing periodically to ensure a professional finish.
4. Installing Subsequent Rows
After the first row is in place, installing the subsequent rows of laminate planks follows a systematic pattern to ensure a uniform and visually appealing installation. Proper interlocking and alignment are key factors in achieving a professional finish.
- One crucial aspect of laying laminate planks is to maintain a consistent gap along the edges to allow for expansion and contraction.
- Begin by placing the next row perpendicular to the first, ensuring that the tongue and groove fit snugly together.
- Continue this step, gently tapping the planks into place using a tapping block and a mallet to secure the interlocking system.
Finishing the Installation
Completing the installation of laminate flooring over concrete involves the final touches that enhance the overall appearance and functionality of the flooring. From trimming the last row of planks to installing skirting boards and transition strips, these finishing steps add polish to the installation.
The next step after laying down the final row of planks is trimming the excess material using a saw or appropriate cutting tool. This ensures a clean and precise finish along the walls. Once the trimming is completed, it is essential to install skirting boards to cover the expansion gap left around the edges of the room. This not only provides a seamless look but also protects the edges of the laminate flooring.
Finally, transition strips are placed where the laminate flooring meets different types of flooring or finishes. These strips not only enhance the aesthetic appeal by providing a smooth transition but also help to secure the edges of the laminate in place. By following these final steps with precision and care, your laminate flooring installation over concrete will be complete and visually pleasing.
Trimming and Fitting the Last Row of Planks
Trimming and fitting the last row of laminate planks is a critical step in completing the installation process. Properly aligning and cutting the planks ensures a seamless fit and a professional finish for the flooring.
In terms of tackling this task on a concrete subfloor, precision becomes even more crucial. Concrete can be unforgiving, requiring meticulous measurements and accurate cuts. One helpful tip is to use a circular saw for clean and sharp edges on the planks.
Before you begin, double-check your measurements and consider the expansion gap to prevent buckling. A steady hand and a keen eye are essential for achieving a precise fit along the perimeter.
Installing Skirting Boards and Transition Strips
Installing skirting boards and threshold strips is the final step in completing the laminate flooring installation. These elements not only enhance the visual appeal of the flooring but also provide a seamless transition between different flooring surfaces.
By ensuring that skirting boards are securely attached to the wall and that threshold strips are properly aligned, you can achieve a polished look that ties the room together. Skirting boards play a crucial role in concealing the expansion gap around the edges of the flooring, while threshold strips create a smooth junction between rooms or different types of flooring.
Tips and Tricks for Installing Laminate Flooring on Concrete
When installing laminate flooring on concrete, incorporating tips and tricks can streamline the process and ensure a successful outcome. From proper subfloor preparation to maintenance guidelines, these insights can help enhance the durability and longevity of the flooring.
One crucial step in the process is to level the concrete subfloor to create a smooth surface for the laminate. Use a self-levelling compound to fill any gaps or cracks. Acclimatise the laminate planks in the room before installation to prevent warping.
- Before laying down the laminate, install a vapour barrier to protect against moisture infiltration.
- Make precise cuts using a sharp utility knife or a power saw for clean edges and a professional finish.
- Regularly clean the flooring with a damp mop and avoid excess water to prevent damage.

See product: Elka 8mm V-Groove Walnut Oak
Common Mistakes to Avoid
Whilst installing laminate flooring on concrete, it is essential to be aware of common mistakes that can compromise the quality and longevity of the installation. Avoiding these pitfalls can help ensure a successful and durable flooring outcome.
One crucial mistake to avoid is inadequate subfloor preparation. Properly levelling and smoothing the concrete surface before installation helps prevent issues such as uneven flooring and premature damage. Using a moisture barrier can shield the laminate from any moisture seeping through the concrete and causing swelling or warping.
Another common error is employing incorrect installation techniques, like not acclimatising the planks before laying them down. Allowing the laminate to adjust to the room’s temperature and humidity levels beforehand is vital to avoid gaps or buckling later on.
Neglecting routine maintenance routines, such as failure to promptly clean up spills or using improper cleaning agents, can diminish the floor’s appearance and lifespan. Regular sweeping and gentle cleaning with recommended products can keep your laminate flooring looking pristine for years to come.
Conclusion
The process of installing laminate flooring on concrete requires careful preparation, precise execution, and attention to detail at every step. By following the recommended guidelines and best practices, you can achieve a durable and visually appealing flooring installation that enhances your space.
- Proper preparation involves assessing the condition of the concrete subfloor, and ensuring it is clean, flat, and dry before laying the underlay. Moisture testing is crucial to prevent issues like warping.
- During execution, acclimatising the laminate to the room’s temperature and leaving expansion gaps around the edges are essential.
- Attention to detail is needed when cutting the planks to fit precisely and securing them properly. These steps, when done meticulously, lead to a successful installation that adds value to your property.
These are the complete guide on how to install laminate flooring on concrete that you can follow. Once again, it’s best to consider using a professional and trusted flooring fitting service to avoid any risks.
If you use flooring fitting services from TEKA Flooring, then you don’t need to worry because there is a 24-month warranty. Furthermore, TEKA Flooring’s team of experts also have a combined experience of more than 30 years, so the quality is guaranteed. Call us today to get a FREE quote on 01733 731 930.
Read also: