Vinyl flooring is a popular choice for many homeowners due to its durability, affordability, and easy maintenance. Before starting a step-by-step guide on how to lay vinyl flooring on concrete, there are important steps to follow to ensure a successful installation of vinyl flooring.
We will discuss the benefits of vinyl flooring, how to prepare a concrete subfloor for installation, the tools needed for the job, and a complete guide on how to lay vinyl flooring on concrete. If you’re ready to transform your space with new flooring, keep reading!
What Is Vinyl Flooring?
Vinyl flooring is a durable and versatile option that is suitable for various spaces in homes and commercial settings. It is available in a wide range of designs, including wood, stone, and tile patterns, providing a cost-effective alternative to natural materials.
One of the key characteristics of vinyl flooring is its resilience, making it highly resistant to scratches, dents, and stains. This makes it an ideal choice for high-traffic areas or places prone to moisture, such as kitchens and bathrooms. Vinyl flooring is known for its easy maintenance – regular sweeping and mopping are usually all that is needed to keep it looking new. Its aesthetic appeal is another advantage, as it can mimic the look of expensive materials like hardwood or stone at a fraction of the cost.

See product: Luvanto Design Washed Grey Oak
The Benefits Of Vinyl Flooring
Vinyl flooring offers numerous benefits, such as water resistance, durability, easy installation, and a wide range of design options to suit various decor styles. It is a cost-effective flooring solution that provides comfort and style to any space.
One of the key advantages of vinyl flooring is its resilience to moisture. This feature makes it an ideal choice for areas prone to spills or high humidity, like kitchens and bathrooms. Vinyl flooring is highly scratch-resistant, ensuring that it maintains its aesthetic appeal even in high-traffic areas.
Vinyl flooring is known for its low maintenance requirements, making it a convenient option for busy households or commercial spaces. Its easy-to-clean surface can simply be wiped or mopped, saving both time and effort.
The affordability of vinyl flooring sets it apart as a budget-friendly yet stylish flooring option, allowing homeowners and businesses to achieve a high-end look without breaking the bank.
How To Prepare Concrete Subfloor For Vinyl Flooring
Before laying vinyl flooring on a concrete subfloor, proper preparation is crucial to ensure a smooth and long-lasting installation. This process involves cleaning the subfloor, repairing any damage, and ensuring the surface is level for optimal results.
1. Cleaning The Subfloor
Cleaning the subfloor is the first step in preparing for vinyl flooring installation. It involves removing any dust, debris, or grease that may affect the adhesion of the vinyl to the concrete surface.
Properly cleaning the subfloor is crucial as it sets the foundation for a successful and long-lasting vinyl flooring application. A thorough cleaning ensures that the new flooring adheres securely, preventing any future issues or premature wear.
- Dust and debris: Utilise a vacuum cleaner or a broom to sweep away all loose particles. Any remaining debris can create lumps or bumps beneath the vinyl, leading to an uneven surface.
- Grease removal: For areas with grease or oil stains, use a degreasing solution to thoroughly clean and degrease the concrete subfloor. This step is crucial as it eliminates any barriers that may hinder proper adhesion.
- Dry surface: After cleaning, allow the subfloor to completely dry before proceeding with the flooring installation. Moisture trapped beneath the vinyl can cause mould, mildew, or even warp the flooring material over time.
2. Repairing Any Damage
Repairing any damage on the concrete subfloor is essential to prevent future issues with the vinyl flooring installation. This step involves fixing cracks, holes, or uneven areas to ensure a smooth surface.
One common method to repair cracks in concrete subfloors is by using a concrete patching compound. Begin by cleaning the crack thoroughly, and removing any debris or loose material. Apply the patching compound following the manufacturer’s instructions, ensuring it is level with the surrounding surface.
For larger holes, consider using a concrete mix to fill the void. When dealing with uneven areas, a self-levelling compound can be used to create a flat surface. Remember, a flat and stable subfloor is crucial for the longevity and appearance of the vinyl flooring.
3. Levelling The Subfloor
Levelling the subfloor is crucial for a successful vinyl flooring installation. This process involves using self-levelling compounds or fillers to create a flat and even surface for the vinyl to adhere properly.
Ensuring the subfloor is level helps prevent issues such as uneven flooring, cracks, or shifting of the vinyl over time.
Levelling the subfloor sets the foundation for a durable and long-lasting vinyl floor that will look professional and stay intact for years to come.
Before application, it’s essential to thoroughly clean and prime the subfloor to ensure proper adhesion of the levelling material. Following the manufacturer’s instructions for mixing and pouring the self-levelling compound will help achieve the desired results.
Tools Needed for Laying Vinyl Flooring On Concrete
Various tools are essential for laying vinyl flooring on a concrete subfloor, including a measuring tape, utility knife, trowel, vinyl adhesive, and roller. These tools help ensure a smooth and efficient installation process.
1. Measuring Tape
A measuring tape is an essential tool for accurately measuring the dimensions of the space where the vinyl flooring will be installed. It ensures precise cuts and proper alignment during the installation process.
Before you embark on installing your vinyl flooring, taking accurate measurements is key to a successful outcome. Using a measuring tape allows you to determine the exact dimensions of the room, ensuring that you purchase the right amount of flooring material without wastage or shortage. When measuring, be sure to account for any irregularities in the shape of the room and consider transitions to other flooring types. These precise measurements enable you to cut the vinyl planks accurately, leading to a seamless finish that looks polished and professional.
2. Utility Knife
A utility knife is a versatile tool that is used for cutting vinyl flooring to fit specific areas and shapes during the installation process. It ensures clean and precise cuts for a seamless finish.
When laying vinyl planks or sheets, accuracy and attention to detail are crucial for achieving a professional-looking result. The sharp blade of the utility knife allows you to easily trim the vinyl to the exact size needed, whether it’s cutting straight lines, or intricate shapes, or trimming edges to fit against walls or corners seamlessly.
3. Trowel
A trowel is a necessary tool for spreading vinyl adhesive evenly on the subfloor before laying the flooring. It ensures proper adhesion and bonding between the vinyl and the concrete surface.
When using a trowel for vinyl flooring installation, the key is to apply the adhesive with precision. By spreading the adhesive using the trowel in a consistent manner, you guarantee that every inch of the subfloor is covered thoroughly. This uniform coverage is crucial in creating a secure bond between the flooring material and the subfloor.
4. Vinyl Adhesive
Vinyl adhesive is a crucial component for securing vinyl flooring to a concrete subfloor. It provides a strong and durable bond that ensures the flooring remains in place over time.
One of the key aspects of using vinyl adhesive is the application method. It is typically spread evenly on the subfloor using a trowel, ensuring full coverage for optimal adhesion. After applying, the adhesive needs sufficient time to dry before laying down the vinyl flooring. This drying process can vary depending on the specific adhesive used, with some requiring only a few hours while others may need longer.
Factors to consider when choosing the right adhesive for vinyl flooring include compatibility with the type of vinyl being installed, the condition of the subfloor, and the overall environmental conditions of the installation area. These considerations help ensure a successful and long-lasting flooring installation.
5. Roller
A roller is used to apply pressure evenly across the vinyl flooring after installation, ensuring proper adhesion to the concrete subfloor. It helps eliminate air pockets and ensures a seamless finish.
When using a roller in the final steps of vinyl flooring installation, start from the centre of the room and work your way towards the edges in smooth, overlapping strokes. This technique helps to press down the flooring firmly, aiding in the elimination of any trapped air bubbles. Remember to put adequate weight on the roller but avoid excessive force to prevent damage to the flooring. By rolling in different directions, you can ensure a flat and uniform surface, contributing to the durability and aesthetics of the finished floor.
How To Lay Vinyl Flooring On Concrete
Laying vinyl flooring on a concrete subfloor requires careful planning and execution to achieve a professional and lasting result.
Assess the condition of the concrete subfloor to ensure it is clean, level, and free of any debris. Use a levelling compound if needed to correct any imperfections.
Next, measure the space accurately to determine how much vinyl flooring you will need.
Once you have the correct measurements, acclimatise the vinyl flooring to the room for at least 48 hours before installation. Begin by laying down a moisture barrier to protect the flooring from any dampness in the concrete.
Proceed to install the vinyl flooring starting from one corner of the room, working your way across and ensuring each piece fits snugly together. Use a vinyl flooring adhesive or click-lock system, depending on the type of vinyl flooring you have chosen.
1. Plan The Layout
Planning the layout is a crucial initial step in laying vinyl flooring on a concrete subfloor. It involves measuring the space, determining the starting point, and optimising the layout for a seamless installation.
By carefully measuring the dimensions of the room and factoring in any irregularities or obstacles, you can ensure a precise fit for the vinyl planks or tiles. Adjusting the layout to accommodate doorways, corners, and transitions between rooms is essential for a professional-looking finish. Strategically planning the layout can help minimise material wastage and reduce the need for costly additional purchases.
2. Cut The Vinyl Flooring
Cutting the vinyl flooring to fit the dimensions of the room is a critical step in the installation process. It requires precision cutting using the appropriate tools to ensure a seamless and tailored fit.
Measuring the area accurately before cutting is crucial; taking into account any protrusions or irregularities in the room layout can make a difference in the final outcome. Accuracy is key when marking the vinyl for cutting – double-checking measurements and using a straight edge can help achieve clean and straight cuts.
When using a utility knife or vinyl cutter, maintaining a steady hand and even pressure is essential to avoid jagged edges or crooked lines. Remember, the success of the overall installation hinges on these precise cuts being executed with care.
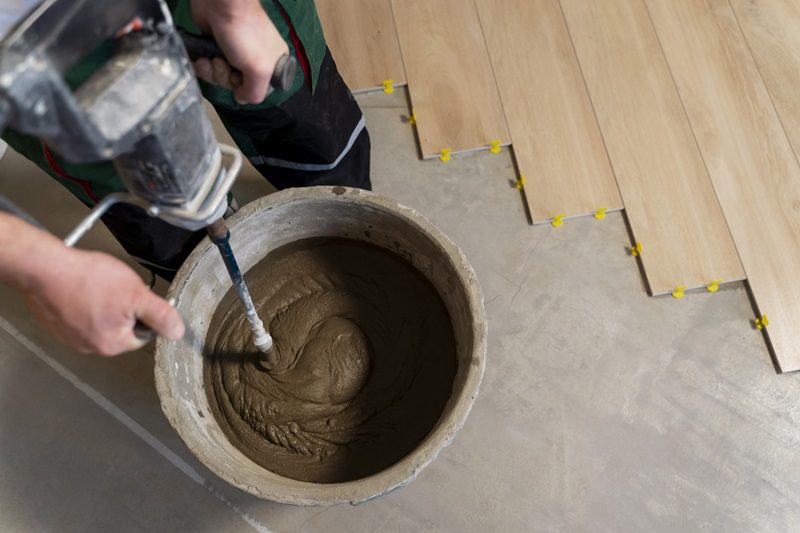
3. Apply Adhesive
Applying adhesive to the concrete subfloor is a crucial step before laying the vinyl flooring. It ensures proper adhesion and bonding between the flooring and the subfloor for a secure installation.
One recommended technique for applying adhesive is to use a notched trowel to spread the adhesive evenly across the subfloor. The ridges created by the trowel help in achieving a consistent layer of adhesive, which is essential for proper bonding. It is important to allow the adhesive to set for the recommended time, usually around 5-10 minutes, before laying the vinyl flooring. This allows the adhesive to reach its optimal tackiness for a strong bond.
4. Lay The Flooring
Laying the vinyl flooring involves carefully positioning the planks or sheets according to the planned layout. It is essential to work systematically and ensure proper alignment for a professional finish.
Begin by preparing the concrete subfloor, ensuring it is clean, dry, and level. Any imperfections must be addressed to prevent them from showing through the vinyl.
Next, measure the room dimensions and determine the centre point to start laying the flooring from, working outward for balanced coverage. Accuracy in this step is crucial for a seamless look.
As you place each piece, remember to leave adequate expansion gaps along the walls to allow for natural movement.
5. Roll Out The Flooring
After laying the vinyl flooring, using a roller to roll out the flooring ensures proper adhesion and smooths out any air bubbles or imperfections. This step is crucial for a flawless finish.
Using a roller properly is essential to achieve the desired results. Begin by starting at one end of the room and work your way towards the other side, applying even pressure as you go. Make sure to roll over all seams and edges to secure them in place. This technique helps eliminate any trapped air, leading to a smooth and professional-looking surface.
How To Finish The Edges Of Vinyl Flooring
Finishing the edges of vinyl flooring is essential to achieve a polished and professional look. By installing skirting boards, using quadrant moulding, and incorporating threshold strips, you can enhance the appearance and durability of your vinyl flooring installation.
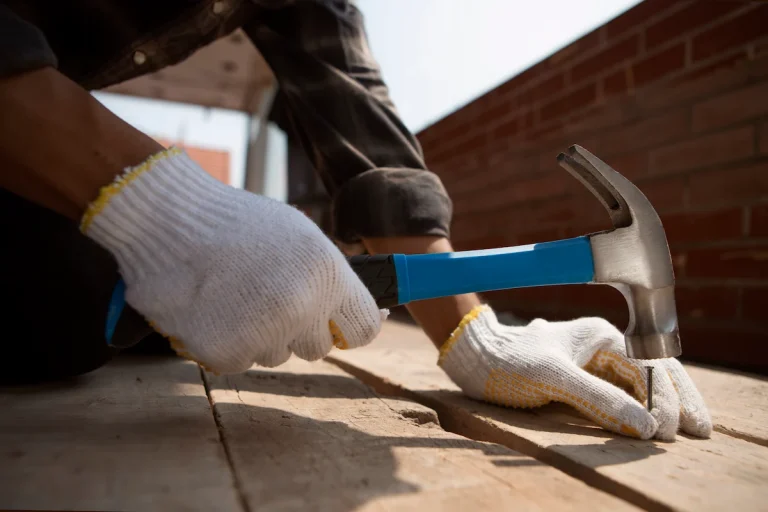
1. Install Skirting Boards
Installing skirting boards along the edges of the vinyl floor provides a tidy and finished look to the installation. Skirting boards also help protect the edges of the floor from damage and wear over time.
In terms of the process of installing skirting boards for vinyl flooring, it’s essential to begin by measuring the length of the walls where the skirting boards will be placed, ensuring a precise fit. Next, gather the necessary tools such as a tape measure, saw, hammer, nails, and a spirit level to ensure straight installation. Make sure to choose skirting boards that complement the flooring colour and design, as they play a significant role in tying the room’s aesthetic together.
- After cutting the skirting boards to the correct length, attach them to the wall using nails or adhesive, ensuring they are securely in place.
- Consider sealing the gaps between the skirting boards and the flooring to create a seamless finish that enhances both the appearance and durability of the vinyl floor.
By carefully following these steps and giving attention to detail, the installation of skirting boards for vinyl flooring can elevate the overall look of the room while providing practical benefits for the long-term maintenance of the flooring.
2. Use Quarter Round Moulding
Quarter-round moulding is a popular choice for finishing the edges of vinyl flooring. It provides a seamless transition between the flooring and the walls, covering any gaps and enhancing the overall appearance of the installation.
When installing vinyl flooring, the use of quarter-round moulding plays a crucial role in creating a polished look. By concealing the expansion gap left during installation, quarter-round moulding not only adds a finishing touch but also serves a practical purpose. This versatile trim can be easily installed using adhesive or nails along the baseboard, ensuring a snug fit.
Proper installation of quarter-round moulding is essential for achieving a professional and clean finish that complements the aesthetic appeal of the flooring.
3. Install Transition Strips
Transition strips are essential for creating smooth transitions between different flooring surfaces or rooms. They provide a finished look and help protect the edges of the vinyl flooring while ensuring a seamless flow throughout the space.
These strips come in various materials such as wood, metal, or laminate, allowing you to match them with your existing decor seamlessly. Whether you need a T-moulding for joining two level surfaces, a reducer for transitioning between different heights, or a threshold strip for connecting vinyl to carpet, there’s a type of transition strip for every scenario. The proper installation of these strips not only adds aesthetic value but also prevents tripping hazards and reduces wear and tear on the flooring edges.
Are you ready to transform your living space with stylish, durable, and affordable flooring? Look no further than TEKA Flooring, your premier destination for high-quality vinyl flooring in Peterborough.
We invite you to flooring store in Peterborough to explore our stunning range of vinyl flooring options in person. Our friendly team is ready to assist you, answer any questions, and help you make the best choice for your home.
Read also: